<?xml version="1.0" encoding="utf-8"?><feed xmlns="http://www.w3.org/2005/Atom" ><generator uri="https://jekyllrb.com/" version="3.10.0">Jekyll</generator><link href="http://blog.philipstreet.co.uk/feed.xml" rel="self" type="application/atom+xml" /><link href="http://blog.philipstreet.co.uk/" rel="alternate" type="text/html" /><updated>2025-01-12T12:32:27+00:00</updated><id>http://blog.philipstreet.co.uk/feed.xml</id><title type="html">Philip Street</title><subtitle>Azure Cloud Solutions Architect</subtitle><entry><title type="html">Issues when using Scoop to install Git on Windows</title><link href="http://blog.philipstreet.co.uk/issues-when-using-scoop-to-install-git-on-windows/" rel="alternate" type="text/html" title="Issues when using Scoop to install Git on Windows" /><published>2024-05-13T00:00:00+00:00</published><updated>2024-05-13T00:00:00+00:00</updated><id>http://blog.philipstreet.co.uk/issues-when-using-scoop-to-install-git-on-windows</id><content type="html" xml:base="http://blog.philipstreet.co.uk/issues-when-using-scoop-to-install-git-on-windows/"><![CDATA[<p>Using <a href="https://scoop.sh" target="_blank">Scoop</a> to install tools without elevated privileges on Windows 11, especially in an Enterprise setting, is super helpful but there can be some knock-on effects to other apps &amp; configuration. One such issue I discovered was to do with Git and Git Credential Manager, so let’s take a look at that.</p>

<h2 id="installing-git-for-windows">Installing Git for Windows</h2>

<p>Install Git on Windows is easy, just run the following;</p>

<figure class="highlight"><pre><code class="language-powershell" data-lang="powershell"><span class="n">scoop</span><span class="w"> </span><span class="nx">install</span><span class="w"> </span><span class="nx">main\git</span></code></pre></figure>

<p>I first realised something was wrong when I was trying to clone a repo from an Azure DevOps organisation I had not worked with for several weeks. I was getting the following;</p>

<figure class="highlight"><pre><code class="language-powershell" data-lang="powershell"><span class="err">❯</span><span class="w">  </span><span class="n">git</span><span class="w"> </span><span class="nx">clone</span><span class="w"> </span><span class="nx">https://</span><span class="p">[</span><span class="n">organisation</span><span class="p">]</span><span class="err">@</span><span class="nx">dev.azure.com/</span><span class="p">[</span><span class="n">organisation</span><span class="p">]</span><span class="nx">/</span><span class="p">[</span><span class="n">project</span><span class="nt">-name</span><span class="p">]</span><span class="nx">/_git/</span><span class="p">[</span><span class="n">repository</span><span class="nt">-name</span><span class="p">]</span><span class="w">
</span><span class="n">Cloning</span><span class="w"> </span><span class="nx">into</span><span class="w"> </span><span class="s1">'[repository-name]'</span><span class="o">...</span><span class="w">
</span><span class="n">Password</span><span class="w"> </span><span class="nx">for</span><span class="w"> </span><span class="s1">'https://[organisation]@dev.azure.com'</span><span class="p">:</span></code></pre></figure>

<p>That’s weird! I’m sure I wasn’t prompted to enter a password the last time I did this…In fact, I’m pretty sure I just logged in via the usual Microsoft Entra ID authentication flow (including MFA). The only thing that had changed was that I had re-installed Git using Scoop.</p>

<h2 id="so-whats-missing">So, what’s missing?</h2>

<p>After a bit of frantic Googling, I realised that <a href="https://github.com/git-ecosystem/git-credential-manager" target="_blank">Git Credential Manager</a> had not been installed. Doh!</p>

<p>This is easily resolved by simply installing GCM using Scoop:</p>

<figure class="highlight"><pre><code class="language-powershell" data-lang="powershell"><span class="n">scoop</span><span class="w"> </span><span class="nx">bucket</span><span class="w"> </span><span class="nx">add</span><span class="w"> </span><span class="nx">extras</span><span class="w">
</span><span class="n">scoop</span><span class="w"> </span><span class="nx">install</span><span class="w"> </span><span class="nx">extras/git-credential-manager</span></code></pre></figure>

<p>Additionally, I need to configure Git to use GCM:</p>

<figure class="highlight"><pre><code class="language-powershell" data-lang="powershell"><span class="n">git</span><span class="w"> </span><span class="nx">config</span><span class="w"> </span><span class="nt">--global</span><span class="w"> </span><span class="nx">credential.store</span><span class="w"> </span><span class="nx">manager</span><span class="w">
</span><span class="n">git</span><span class="w"> </span><span class="nx">config</span><span class="w"> </span><span class="nt">--global</span><span class="w"> </span><span class="nx">credential.helper</span><span class="w"> </span><span class="nx">manager</span></code></pre></figure>

<h2 id="what-about-wsl">What about WSL?</h2>

<p>The above will fix things for Windows, but what about WSL? Well, you <em>can</em> install GCM in WSL as well but that means having separate credential stores. The best experience is to let GCM share credentials &amp; settings between WSL and the Windows host. This can be achieved by doing the following.</p>

<p><em>Inside your WSL installation</em>, run the following command to set GCM as the Git credential helper installed by Scoop, which will not be in the default location indicated on <a href="https://github.com/git-ecosystem/git-credential-manager/blob/release/docs/wsl.md">GCM on Windows Subsystem for Linux (WSL)</a>:</p>

<figure class="highlight"><pre><code class="language-bash" data-lang="bash">git config <span class="nt">--global</span> credential.helper <span class="s2">"/mnt/c/Users/[username]/scoop/shims/git-credential-manager.exe"</span>

<span class="c"># For Azure DevOps support only</span>

git config <span class="nt">--global</span> credential.&lt;https://dev.azure.com.useHttpPath&gt; <span class="nb">true</span></code></pre></figure>

<blockquote>
  <p><strong>Note:</strong> change [username] so that the path is valid.</p>
</blockquote>

<h2 id="wrap-up">Wrap-up</h2>

<p>I learned two things from this experience:</p>

<ol>
  <li>Always check what is - and what isn’t - being installed by Scoop.</li>
  <li>Additional configuration may be required when performing a user-only install, instead of a system-wide install.</li>
</ol>

<h2 id="conclusion">Conclusion</h2>

<p>I hope you’ve found this useful.</p>

<p>As always, if you think there is a better way this could’ve been fixed then please leave a comment below.</p>]]></content><author><name></name></author><category term="windows" /><category term="scoop" /><category term="git" /><category term="gcm" /><category term="WSL" /><summary type="html"><![CDATA[Using Scoop to install tools without elevated privileges on Windows 11, especially in an Enterprise setting, is super helpful but there can be some knock-on effects to other apps &amp; configuration. One such issue I discovered was to do with Git and Git Credential Manager, so let’s take a look at that.]]></summary><media:thumbnail xmlns:media="http://search.yahoo.com/mrss/" url="http://blog.philipstreet.co.uk/2024-05-13-git-clone-prompt-password.png" /><media:content medium="image" url="http://blog.philipstreet.co.uk/2024-05-13-git-clone-prompt-password.png" xmlns:media="http://search.yahoo.com/mrss/" /></entry><entry><title type="html">Starship for Command Prompt on Windows 11</title><link href="http://blog.philipstreet.co.uk/starship-for-command-prompt/" rel="alternate" type="text/html" title="Starship for Command Prompt on Windows 11" /><published>2024-05-08T00:00:00+00:00</published><updated>2024-05-08T00:00:00+00:00</updated><id>http://blog.philipstreet.co.uk/starship-for-command-prompt</id><content type="html" xml:base="http://blog.philipstreet.co.uk/starship-for-command-prompt/"><![CDATA[<p>In a follow-up to my previous post <a href="https://blog.philipstreet.co.uk/Starship-prompt-for-PowerShell-and-WSL-on-Windows-11/" target="_blank">Starship prompt for PowerShell &amp; WSL on Windows 11</a>, I’ll show how to configure Starship for the good old native Windows shell cmd.exe.</p>

<p>These instructions assume you have already configured Starship as per my previous blog post. If not, follow those instructions first before proceeding.</p>

<h2 id="can-i-really-customise-the-humble-windows-shell-cmdexe">Can I really customise the humble Windows shell cmd.exe?</h2>

<p>Yes you can! Here’s mine, which looks almost exactly like my PowerShell and WSL instance;</p>

<p><img src="/images/2024-05-08-starship-command-prompt.png" alt="Command Prompt" /></p>

<h3 id="step-1-install-clink-using-scoop">Step 1: Install Clink using Scoop</h3>

<p>Customising the Command Prompt using Starship is achieved using a tool called <a href="https://chrisant996.github.io/clink/clink.html" target="_blank">Clink</a>.</p>

<p>The first step is to install Clink, which is as simple as opening Windows Terminal and running the following PowerShell;</p>

<figure class="highlight"><pre><code class="language-powershell" data-lang="powershell"><span class="n">scoop</span><span class="w"> </span><span class="nx">bucket</span><span class="w"> </span><span class="nx">add</span><span class="w"> </span><span class="nx">main</span><span class="w">
</span><span class="n">scoop</span><span class="w"> </span><span class="nx">install</span><span class="w"> </span><span class="nx">main/clink</span></code></pre></figure>

<h3 id="step-2-configure-clink-to-load-starship">Step 2: Configure Clink to load Starship</h3>

<p>Add the following to a file called <code class="language-plaintext highlighter-rouge">starship.lua</code> and save in a Clink scripts directory:</p>

<figure class="highlight"><pre><code class="language-lua" data-lang="lua"><span class="c1">-- starship.lua</span>
<span class="n">os</span><span class="p">.</span><span class="n">setenv</span><span class="p">(</span><span class="s1">'STARSHIP_CONFIG'</span><span class="p">,</span> <span class="s1">'C:\\Users\\?\\.config\\starship\\starship.toml'</span><span class="p">)</span>
<span class="nb">load</span><span class="p">(</span><span class="nb">io.popen</span><span class="p">(</span><span class="s1">'starship init cmd'</span><span class="p">):</span><span class="n">read</span><span class="p">(</span><span class="s2">"*a"</span><span class="p">))()</span></code></pre></figure>

<p>Replace “?” with the relevant Windows “username” so that the path is valid, or modify the path to where you have your Starship TOML file saved. This means that the Command Prompt will use the same Starship configuration file as both your Windows Terminal AND WSL instance, ensuring consistency across all prompts!</p>

<h2 id="and-theres-more">And there’s more!</h2>

<p>Clink as a powerful tool for customising the cmd.exe, including <a href="https://chrisant996.github.io/clink/clink.html#features" target="_blank">features</a> such auto-suggestions, completions, persistent history and key bindings!</p>

<p>If you spend a lot of time using Command Prompt then take a look at the multitude of <a href="https://chrisant996.github.io/clink/clink.html#configuring-clink" target="_blank">configuration options</a>, but be careful you don’t conflict with customisations provided by Starship.</p>

<h2 id="wrap-up">Wrap Up</h2>

<p>All of the above code &amp; config snippets are available on my <a href="https://github.com/philipstreet/dev-machine-config/tree/main" target="_blank">dev-machine-configuration</a> GitHub repo.</p>

<h2 id="conclusion">Conclusion</h2>

<p>I hope this will be of help to you. Let me know if you have any suggestions for improvements in the comments.</p>]]></content><author><name></name></author><category term="windows" /><category term="shell" /><category term="prompt" /><category term="starship" /><category term="command-prompt" /><summary type="html"><![CDATA[In a follow-up to my previous post Starship prompt for PowerShell &amp; WSL on Windows 11, I’ll show how to configure Starship for the good old native Windows shell cmd.exe.]]></summary><media:thumbnail xmlns:media="http://search.yahoo.com/mrss/" url="http://blog.philipstreet.co.uk/2024-05-08-starship-command-prompt-extract.png" /><media:content medium="image" url="http://blog.philipstreet.co.uk/2024-05-08-starship-command-prompt-extract.png" xmlns:media="http://search.yahoo.com/mrss/" /></entry><entry><title type="html">Put on [Resource Type] [Resource Name] Failed with 1 faulted referenced [Resource Type](s)</title><link href="http://blog.philipstreet.co.uk/put-on-resource-failed-with-faulted-reference-resource/" rel="alternate" type="text/html" title="Put on [Resource Type] [Resource Name] Failed with 1 faulted referenced [Resource Type](s)" /><published>2024-05-07T00:00:00+00:00</published><updated>2024-05-07T00:00:00+00:00</updated><id>http://blog.philipstreet.co.uk/put-on-resource-failed-with-faulted-reference-resource</id><content type="html" xml:base="http://blog.philipstreet.co.uk/put-on-resource-failed-with-faulted-reference-resource/"><![CDATA[<p>This error can occur when you’re trying to deploy a change to an Azure network resource, but its provisioning state, or one of its dependencies, is “Failed”. Should I start panicking now? Why does this happen? And how do I fix it?</p>

<p>This is Part 1 of a series of posts regarding this issue.</p>

<h2 id="the-provisioning-state-is-failed-should-i-be-worried">The provisioning state is “Failed”! Should I be worried?</h2>

<p>As explained in <a href="https://learn.microsoft.com/en-us/azure/networking/troubleshoot-failed-state" target="_blank">Troubleshoot Azure Microsoft.Network failed provisioning state</a>;</p>

<blockquote>
  <p>These states are metadata properties of the resource. They’re independent from the functionality of the resource itself. Being in the failed state doesn’t necessarily mean that the resource isn’t functional. In most cases, it can continue operating and serving traffic without issues.</p>
</blockquote>

<p>OK, panic over, but…</p>

<h2 id="whats-the-cause-of-this">What’s the cause of this?</h2>

<p>There are different reasons why this can occur that seem to vary depending on the resource type, whether it be an IP Group, Azure Firewall Policy, Azure Firewall etc.</p>

<p>For Azure Firewall, I recently found this can occur if you attempt to push changes to IP Groups in parallel. This is a known issue, which can be found <a href="https://learn.microsoft.com/en-us/azure/firewall/firewall-known-issues" target="_blank">Azure Firewall known issues and limitations</a>. Fortunately, there is a feature that is currently in preview to support <a href="https://learn.microsoft.com/en-us/azure/firewall/ip-groups#parallel-ip-group-updates-preview" target="_blank">parallel IP Group updates</a>, although I’m not sure how a CI/CD will know to limit parallel updates to a specific number.</p>

<h2 id="so-how-do-i-fix-it">So, how do I fix it?</h2>

<p>For resources in a Failed provisioning state, you can <a href="https://learn.microsoft.com/en-us/azure/networking/troubleshoot-failed-state#restoring-succeeded-state-through-a-put-operation" target="_blank">Restore succeeded state through a PUT operation</a>.</p>

<p>The easiest way to achieve this task is to use Azure PowerShell. Issue a resource-specific Get command that fetches all the current configuration for the resource. Next, run a Set command, or equivalent, to commit to Azure a write operation that contains all the resource properties as currently configured.</p>

<p>You can find a list of <a href="https://learn.microsoft.com/en-us/azure/networking/troubleshoot-failed-state#azure-powershell-cmdlets-to-restore-succeeded-provisioning-state" target="_blank">Azure PowerShell cmdlets to restore succeeded provisioning state</a>.</p>

<h2 id="didnt-you-say-something-about-dependencies">Didn’t you say something about dependencies?</h2>

<p>That’s right. If you have several resources that are “chained” in some way then you may find that one or more of them have a Failed provisioning state.</p>

<p>A recent customer of mine experienced this where they had multiple resources chained together like so;</p>

<p><img src="/images/2024-05-07-chained-resources.png" alt="Chained resources" class="centered" /></p>

<p>They couldn’t deploy changes to some of the IP Groups referenced by the Parent Azure Firewall Policy because it had a Failed provisioning state, which was because the Child Azure Firewall Policy had a Failed provisioning state, which in turn was because the Secondary Azure Firewall had a Failed provisioning state.</p>

<p>We resolved the situation by doing the following:</p>

<ul>
  <li>Perform a PUT operation on the Secondary Azure Firewall</li>
  <li>Perform a PUT operation on the Child Azure Firewall Policy</li>
  <li>Perform a PUT operation on the Parent Azure Firewall Policy</li>
</ul>

<p>The lesson here is that you will need to check all resources in the dependency chain before you perform any of the PUT operations. If you perform the PUT operations in the wrong order then they will fail.</p>

<h2 id="conclusion">Conclusion</h2>

<p>I hope this helps someone that experiences the same issue.</p>

<p>As always, if you think there is a better way this could’ve been fixed then please leave a comment below.</p>]]></content><author><name></name></author><category term="azure" /><category term="troubleshooting" /><summary type="html"><![CDATA[This error can occur when you’re trying to deploy a change to an Azure network resource, but its provisioning state, or one of its dependencies, is “Failed”. Should I start panicking now? Why does this happen? And how do I fix it?]]></summary><media:thumbnail xmlns:media="http://search.yahoo.com/mrss/" url="http://blog.philipstreet.co.uk/2024-05-07-chained-resources.png" /><media:content medium="image" url="http://blog.philipstreet.co.uk/2024-05-07-chained-resources.png" xmlns:media="http://search.yahoo.com/mrss/" /></entry><entry><title type="html">Starship for PowerShell &amp;amp; WSL on Windows 11</title><link href="http://blog.philipstreet.co.uk/Starship-prompt-for-PowerShell-and-WSL-on-Windows-11/" rel="alternate" type="text/html" title="Starship for PowerShell &amp;amp; WSL on Windows 11" /><published>2024-04-28T00:00:00+00:00</published><updated>2024-04-28T00:00:00+00:00</updated><id>http://blog.philipstreet.co.uk/Starship-prompt-for-PowerShell-and-WSL-on-Windows-11</id><content type="html" xml:base="http://blog.philipstreet.co.uk/Starship-prompt-for-PowerShell-and-WSL-on-Windows-11/"><![CDATA[<p>“One Prompt to config them all,<br />
One Prompt to style them,<br />
One Prompt to display in all<br />
and in the Shell bind them.”</p>

<p>by J. R. R. Tolkien….maybe.</p>

<h2 id="introduction">Introduction</h2>

<p>I recently watched <a href="https://www.youtube.com/watch?v=wXK4RGrBLuM&amp;t=7s" target="_blank">Starship! One prompt to rule them all</a> by <a href="https://www.youtube.com/@matt-ffffff" target="_blank">Matt Field</a> and loved the idea of having a consistent look and feel across all the prompts that I use on my Windows 11 machines, whether that be PowerShell or WSL Ubuntu in either Windows Terminal or Visual Studio Code. Such as;</p>

<p><img src="/images/2024-04-28-windows-terminal.png" alt="Windows Terminal" class="centered" />
<img src="/images/2024-04-28-wsl-ubuntu.png" alt="WSL Ubuntu" class="centered" /></p>

<p>Briefly, the above images are showing (from left to right);</p>

<ul>
  <li>The platform (Windows or Linux)</li>
  <li>The shell (PowerShell or Bash)</li>
  <li>I’m in the “dev-machine-config” folder</li>
  <li>This is a GitHub repo</li>
  <li>I’m in the “main” branch</li>
  <li>The name of the Azure subscription that AZ CLI is currently logged into</li>
</ul>

<p><strong><em>WARNING!</em></strong> This article is written for Windows 11 users. Those on macOS or Linux may not have these issues and will need to follow slightly different instructions.</p>

<p>After trying to follow Matt’s instructions I discovered that not everything was going to work on my work laptop because I don’t have the permissions to start / run a prompt with elevated privileges. Also, some of the tasks required to get Starship setup can be done in several different ways, some easier than others. So I thought it might be useful to document my findings here for the benefit of others.</p>

<h2 id="whats-starship">What’s Starship?</h2>

<p>“What’s Starhip?”, I hear you ask. <a href="https://starship.rs" target="_blank">Starship</a> is a cross-platform cross-shell prompt written in Rust, so is blazingly fast. It allows you to customise and augment the prompt with additional information that you may find useful.</p>

<h2 id="sold-how-do-i-get-this-setup">Sold! How do I get this setup?</h2>

<p>Before you run headlong into trying to install Starship, you need to install a few dependencies first. As I said before, I couldn’t install Starship using Winget or Chocolatey as I did not have the permissions to start Windows Terminal with elevated privileges. After a bit of sluething, I discovered an alternative package manager called <a href="https://scoop.sh" target="_blank">Scoop</a>, which allowed me to install Starship without elevated privileges, as well as other helpful tools.</p>

<h3 id="step-1-install-scoop-in-windows">Step 1: Install Scoop in Windows</h3>

<p>The first step is to install Scoop, which is as simple as opening Windows Terminal and running the following PowerShell;</p>

<figure class="highlight"><pre><code class="language-powershell" data-lang="powershell"><span class="n">Set-ExecutionPolicy</span><span class="w"> </span><span class="nt">-ExecutionPolicy</span><span class="w"> </span><span class="nx">RemoteSigned</span><span class="w"> </span><span class="nt">-Scope</span><span class="w"> </span><span class="nx">CurrentUser</span><span class="w">
</span><span class="n">Invoke-RestMethod</span><span class="w"> </span><span class="nt">-Uri</span><span class="w"> </span><span class="p">[</span><span class="n">https</span><span class="p">:</span><span class="n">//get.scoop.sh</span><span class="p">](</span><span class="n">https</span><span class="p">:</span><span class="n">//get.scoop.sh</span><span class="p">){:</span><span class="n">target</span><span class="o">=</span><span class="s2">"_blank"</span><span class="p">}</span><span class="w"> </span><span class="o">|</span><span class="w"> </span><span class="n">Invoke</span><span class="nt">-Expression</span></code></pre></figure>

<h3 id="step-2-install-a-nerd-font">Step 2: Install a Nerd Font</h3>

<p>I’m using Microsoft’s Cascadia Code TrueType font, which can be installed on Windows using, you guessed it, Scoop!</p>

<figure class="highlight"><pre><code class="language-powershell" data-lang="powershell"><span class="n">scoop</span><span class="w"> </span><span class="nx">bucket</span><span class="w"> </span><span class="nx">add</span><span class="w"> </span><span class="nx">nerd-fonts</span><span class="w">
</span><span class="n">scoop</span><span class="w"> </span><span class="nx">install</span><span class="w"> </span><span class="nx">nerd-fonts/CascadiaCode-NF</span></code></pre></figure>

<p>I also needed to install it in my WSL Ubuntu instance as well. This can be done using a tool called <em>NFDL</em> (<a href="https://github.com/rubiin/nfdl" target="_blank">Nerd Fonts Downloader</a>), which is a small NodeJS app. So, first install NodeJS and NPM - if you don’t have them already - and then NFDL;</p>

<figure class="highlight"><pre><code class="language-bash" data-lang="bash"><span class="nb">sudo </span>apt-get <span class="nb">install</span> <span class="nt">-y</span> nodejs npm
npm <span class="nb">install</span> <span class="nt">-g</span> nfdl</code></pre></figure>

<p>Then run the cli;</p>

<figure class="highlight"><pre><code class="language-bash" data-lang="bash">nfdl</code></pre></figure>

<p>Select your desired Nerd Font from the menu and let the cli handle the rest. By default, fonts will be downloaded and installed in the .fonts directory in your home directory.</p>

<h3 id="step-3-configure-windows-terminal-to-use-the-downloaded-nerd-font">Step 3: Configure Windows Terminal to use the downloaded Nerd Font</h3>

<p>By default Windows Terminal uses a standard font, so you need to tell it to use the new Nerd Font. Open Windows Terminal &gt; Settings, and select Profile Defaults &gt; Appearance, and select your Nerd Font from the the Font face dropdown list. For me that meant selecting “CaskaydiaCode NF”. If you don’t want to apply the font to all profiles then select each profile to set the Font face.</p>

<h3 id="step-4-configure-visual-studio-code-to-use-the-downloaded-nerd-font">Step 4: Configure Visual Studio Code to use the downloaded Nerd Font</h3>

<p>By default Visual Studio Code uses a standard font, so you need to tell it to use the new Nerd Font. Open Visual Studio Code &gt; Preferences &gt; Settings, then Text Editor &gt; Font and type the name of your Nerd Font and click Save. For me that meant entering “CaskaydiaCove NF”.</p>

<h3 id="step-5-install-starship-on-windows">Step 5: Install Starship on Windows</h3>

<p>To install Starship on Windows, open Windows Terminal and run the following PowerShell;</p>

<figure class="highlight"><pre><code class="language-powershell" data-lang="powershell"><span class="n">scoop</span><span class="w"> </span><span class="nx">bucket</span><span class="w"> </span><span class="nx">add</span><span class="w"> </span><span class="nx">main</span><span class="w">
</span><span class="n">scoop</span><span class="w"> </span><span class="nx">install</span><span class="w"> </span><span class="nx">main/starship</span></code></pre></figure>

<p>You then need to edit your PowerShell profile to run Starship at startup. From the same Windows Terminal run;</p>

<figure class="highlight"><pre><code class="language-powershell" data-lang="powershell"><span class="n">notepad</span><span class="w"> </span><span class="bp">$PROFILE</span></code></pre></figure>

<p>and then add the following code at the bottom;</p>

<figure class="highlight"><pre><code class="language-powershell" data-lang="powershell"><span class="nv">$</span><span class="nn">ENV</span><span class="p">:</span><span class="nv">STARSHIP_CONFIG</span><span class="w"> </span><span class="o">=</span><span class="w"> </span><span class="s2">"</span><span class="bp">$HOME</span><span class="s2">\.config\starship\starship.toml"</span><span class="w">
</span><span class="n">Invoke-Expression</span><span class="w"> </span><span class="p">(</span><span class="o">&amp;</span><span class="n">starship</span><span class="w"> </span><span class="nx">init</span><span class="w"> </span><span class="nx">powershell</span><span class="p">)</span></code></pre></figure>

<p>You need to create a configuration file for Starship, which is the “starship.toml” path in the above code. Follow the <a href="https://starship.rs/config/" target="_blank">instructions</a>, or you can download and use <a href="https://github.com/philipstreet/dev-machine-config/blob/main/starship/starship.toml" target="_blank">my configuration from my GitHub repo</a>. Ensure the path to your starship.toml file matches the one you configure in your STARTSHIP_CONFIG environment variable.</p>

<h3 id="step-6-install-starship-in-your-wsl-instance">Step 6: Install Starship in your WSL instance</h3>

<p>To install Starship on your WSL instance, run the following Bash script;</p>

<figure class="highlight"><pre><code class="language-bash" data-lang="bash">curl <span class="nt">-sS</span> https://starship.rs/install.sh | sh</code></pre></figure>

<p>Then add the following to your .bashrc file;</p>

<figure class="highlight"><pre><code class="language-bash" data-lang="bash"><span class="nb">export </span><span class="nv">STARSHIP_CONFIG</span><span class="o">=</span>/mnt/c/Users/?/.config/starship/starship.toml
<span class="nb">eval</span> <span class="s2">"</span><span class="si">$(</span>starship init bash<span class="si">)</span><span class="s2">"</span></code></pre></figure>

<p>Replace “?” with the relevant Windows “username” so that the path is valid from WSL, or modify the path to where you have your Starship TOML file saved. This means that both your Windows Terminal AND WSL instance will use the same Starship configuration file, ensuring consistency across both platforms!</p>

<h2 id="wrap-up">Wrap Up</h2>

<p>All of the above code &amp; config snippets are available on my <a href="https://github.com/philipstreet/dev-machine-config/tree/main" target="_blank">dev-machine-configuration</a> GitHub repo.</p>

<p>When you open a PowerShell or WSL prompt, either from Windows Terminal or Visual Studio Code, you should now have a consistent user experience! Enjoy!</p>

<h2 id="conclusion">Conclusion</h2>

<p>I hope this will be of help to you. Let me know if you have any suggestions for improvements in the comments.</p>]]></content><author><name></name></author><category term="windows" /><category term="shell" /><category term="prompt" /><category term="starship" /><summary type="html"><![CDATA[“One Prompt to config them all, One Prompt to style them, One Prompt to display in all and in the Shell bind them.”]]></summary><media:thumbnail xmlns:media="http://search.yahoo.com/mrss/" url="http://blog.philipstreet.co.uk/2024-04-28-starship-extract.png" /><media:content medium="image" url="http://blog.philipstreet.co.uk/2024-04-28-starship-extract.png" xmlns:media="http://search.yahoo.com/mrss/" /></entry><entry><title type="html">Object ID is not authorized to register Azure resource provider</title><link href="http://blog.philipstreet.co.uk/object-id-not-authorized-to-register-resource-provider/" rel="alternate" type="text/html" title="Object ID is not authorized to register Azure resource provider" /><published>2024-03-27T00:00:00+00:00</published><updated>2024-03-27T00:00:00+00:00</updated><id>http://blog.philipstreet.co.uk/object-id-not-authorized-to-register-resource-provider</id><content type="html" xml:base="http://blog.philipstreet.co.uk/object-id-not-authorized-to-register-resource-provider/"><![CDATA[<p>If you receive this error when trying to deploy some changes to Azure, you would be forgiven for thinking, “That looks like a Resource Provider hasn’t been registered on a Subscription, but my Service Principal has permissions to do that…so why didn’t it work?!”</p>

<p>Well, you would be right…and wrong. Let me explain.</p>

<h2 id="not-authorized-to-do-what">Not authorized to do what?</h2>

<p>I had this issue recently when I was trying to use Terraform to create a Private Endpoint on an Azure Key Vault to a Virtual Network Subnet that was located in a different Subscription.</p>

<p>Here’s the error from my Azure DevOps pipeline run.</p>

<p><a href="/images/2024-03-27-object-id-not-authorized-to-register-resource-provider-pipeline.png" target="_blank"><img src="/images/2024-03-27-object-id-not-authorized-to-register-resource-provider-pipeline.png" alt="Error message from Azure Devops pipeline run" /></a></p>

<p>The error was;</p>

<blockquote>
  <p>The client ‘’ with object id ‘’ does not have authorization to perform action ‘microsoft.network/virtualnetworks/taggedTrafficConsumers/validate/action’ over scope ‘/subscriptions/ /resourcegroups/ /providers/microsoft.network/virtualnetworks/ /taggedTrafficConsumers/Microsoft.KeyVault.northeurope’ or the scope is invalid. If access was recently granted, please refresh your credentials."</p>
</blockquote>

<h2 id="whats-the-cause-of-this">What’s the cause of this?</h2>

<p>After a bit of Googling (or Binging?) I worked out that “/validate/action” authorization is required to register a Resource Provider in a Subscription.</p>

<p>Since I was working with two resource types - Virtual Networks and Key Vaults - I checked both Subscriptions, and discovered that the Subscription containing the Virtual Network did NOT have the “Microsoft.KeyVault” Resource Provider registered.</p>

<p>BUT….</p>

<p>The Service Principal being used by the Service Connection had the correct RBAC permissions on both Subscriptions, i.e. Contributor, which should be enough to register a missing Resource Provider.</p>

<p><img src="/images/2024-03-27-object-id-not-authorized-to-register-resource-provider-mslearn.png" alt="alt text" class="centered" /></p>

<p>You must have permission to do the /register/action operation for the resource provider. The permission is included in the Contributor and Owner roles.</p>

<p>Unfortunately, that will only work if you have Terraform code that is directly trying to manage a resource in a target Subscription.</p>

<p><strong>In my scenario, I was setting the Private Endpoint subnet_id attribute with the Virtual Network subnet located in a different Subscription.</strong></p>

<h2 id="so-how-do-i-fix-it">So, how do I fix it?</h2>

<p>There are two solutions to this:</p>

<ol>
  <li>Add code that will explicitly register the required Resource Provider in the target Subscription, e.g</li>
</ol>

<figure class="highlight"><pre><code class="language-terraform" data-lang="terraform"><span class="k">resource</span> <span class="s2">"azurerm_resource_provider_registration"</span> <span class="s2">"example"</span> <span class="p">{</span>
    <span class="nx">name</span> <span class="p">=</span> <span class="s2">"Microsoft.KeyVault"</span>
    <span class="nx">alias</span> <span class="p">=</span> <span class="k">provider</span><span class="p">.</span><span class="nx">other_subscription</span>
<span class="p">}</span></code></pre></figure>

<ol>
  <li>If you have the permissions then manually register the Resource Provider yourself on the required Subscription.</li>
</ol>

<h2 id="conclusion">Conclusion</h2>

<p>I hope this helps someone that experiences the same issue.</p>

<p>As always, if you think there is a better way this could’ve been fixed then please leave a comment below.</p>]]></content><author><name></name></author><category term="azure" /><category term="terraform" /><category term="troubleshooting" /><summary type="html"><![CDATA[If you receive this error when trying to deploy some changes to Azure, you would be forgiven for thinking, “That looks like a Resource Provider hasn’t been registered on a Subscription, but my Service Principal has permissions to do that…so why didn’t it work?!”]]></summary><media:thumbnail xmlns:media="http://search.yahoo.com/mrss/" url="http://blog.philipstreet.co.uk/2024-03-27-object-id-not-authorized-to-register-resource-provider-pipeline.png" /><media:content medium="image" url="http://blog.philipstreet.co.uk/2024-03-27-object-id-not-authorized-to-register-resource-provider-pipeline.png" xmlns:media="http://search.yahoo.com/mrss/" /></entry><entry><title type="html">TLS Inspection for DMZ Azure Application Gateway &amp;amp; Azure Firewall - certificate options, issues and limitations</title><link href="http://blog.philipstreet.co.uk/TLS-Inspection-for-DMZ-Azure-Application-Gateway-and-Azure-Firewall/" rel="alternate" type="text/html" title="TLS Inspection for DMZ Azure Application Gateway &amp;amp; Azure Firewall - certificate options, issues and limitations" /><published>2024-03-26T00:00:00+00:00</published><updated>2024-03-26T00:00:00+00:00</updated><id>http://blog.philipstreet.co.uk/TLS%20Inspection-for-DMZ-Azure-Application-Gateway-and-Azure-Firewall</id><content type="html" xml:base="http://blog.philipstreet.co.uk/TLS-Inspection-for-DMZ-Azure-Application-Gateway-and-Azure-Firewall/"><![CDATA[<p>If the title of this article isn’t long enough then the rest of the blog post will make up for it, because there’s a lot to cover.</p>

<p>I recently worked with a customer that wanted to deploy a conventional DMZ environment architecture in Azure using Azure Application Gateways and Azure Firewall, leveraging the various security features of Azure Firewall Premium SKU but specifically TLS Inspection for in-bound HTTP(S) traffic.</p>

<p>This article specifically describes my challenges with configuring TLS Inspection in an enterprise environment.</p>

<p><strong>UPDATED on 19th May 2024 after receiving a few comments and questions about <a href="#what-about-lets-encrypt">Let’s Encrypt</a> and <a href="#option-4---purchase-a-managed-private-pki">managed private PKI</a>.</strong></p>

<h2 id="architecture">Architecture</h2>

<p>We’ll be using a specific architectural scenario, which is the <a href="https://learn.microsoft.com/en-us/azure/architecture/example-scenario/gateway/application-gateway-before-azure-firewall" target="_blank">Zero-trust network for web applications with Azure Firewall and Application Gateway</a>, where the Azure Application Gateway sits in front of the Azure Firewall. The HTTP(S) traffic passes through those devices before getting to the backend services (API Management, App Service etc).</p>

<p><img src="/images/2024-03-26-TLS-Inspection.png" alt="Architecture diagram showing the packet flow in a web app network that uses Application Gateway in front of Azure Firewall Premium." class="centered" /></p>

<p>When looking at the end-to-end TLS connection between the user and the backend service, the following occurs:</p>

<ul>
  <li>The user’s browser establishes a TLS connection to the Azure Application Gateway, which has a certificate configured as part of its HTTP(S) Listener. Termination of the TLS connection on the Azure Application Gateway allows it to perform Web Application Firewall (WAF) traffic inspection.</li>
  <li>The Azure Application Gateway creates a new TLS connection to the “backend” via the Azure Firewall. Termination of the TLS connection on the Azure Firewall allows it to perform TLS Inspection.</li>
  <li>The Azure Firewall creates a new TLS connection to the backend service.</li>
</ul>

<p>To decrypt and inspect TLS traffic, Azure Firewall Premium dynamically generates certificates and presents itself to the Application Gateway as the web server. The Azure Firewall has to use an CA certificate to sign the certificates that it generates.</p>

<p>The certificate used by Azure Firewall for TLS Inspection has <a href="https://learn.microsoft.com/en-us/azure/firewall/premium-certificates#intermediate-ca-certificate-requirements" target="_blank">very specific requirements</a>.</p>

<h2 id="options">Options</h2>

<p>There are 4 options when configuring Azure Firewall with a CA certificate to be used for TLS Inspection, according to the official Microsoft documentation <a href="https://learn.microsoft.com/en-us/azure/firewall/premium-certificates#configure-a-certificate-in-your-policy" target="_blank">Azure Firewall Premium Certificates</a>:</p>

<ol>
  <li>Create your own self-signed certificate</li>
  <li>Use your enterprise PKI to create an Intermediate CA certificate</li>
  <li>Certificate auto-generation (via the Azure Portal)</li>
  <li>Purchase a managed private PKI</li>
</ol>

<p>I’ll go through each option, discuss some Pros and Cons, identify some limitations, and talk about some of the issues I encountered.</p>

<h3 id="option-1---create-your-own-self-signed-certificate">Option 1 - Create your own self-signed certificate</h3>

<p>For Dev/Test environments, Microsoft suggest <a href="https://learn.microsoft.com/en-us/azure/firewall/premium-certificates#create-your-own-self-signed-ca-certificate" target="_blank">creating a self-signed sertificate</a> using OpenSSL and their provided config file with either the Bash or PowerShell script to generate root CA and intermediate CA certificates that you can then use on the Azure Application Gateway and AzureFirewall resources (respectively).</p>

<h4 id="openssl-command-line-what-about-terraform">OpenSSL command-line?! What about Terraform?</h4>

<p>I’m glad you asked, because I spent a fair amount of time on this.
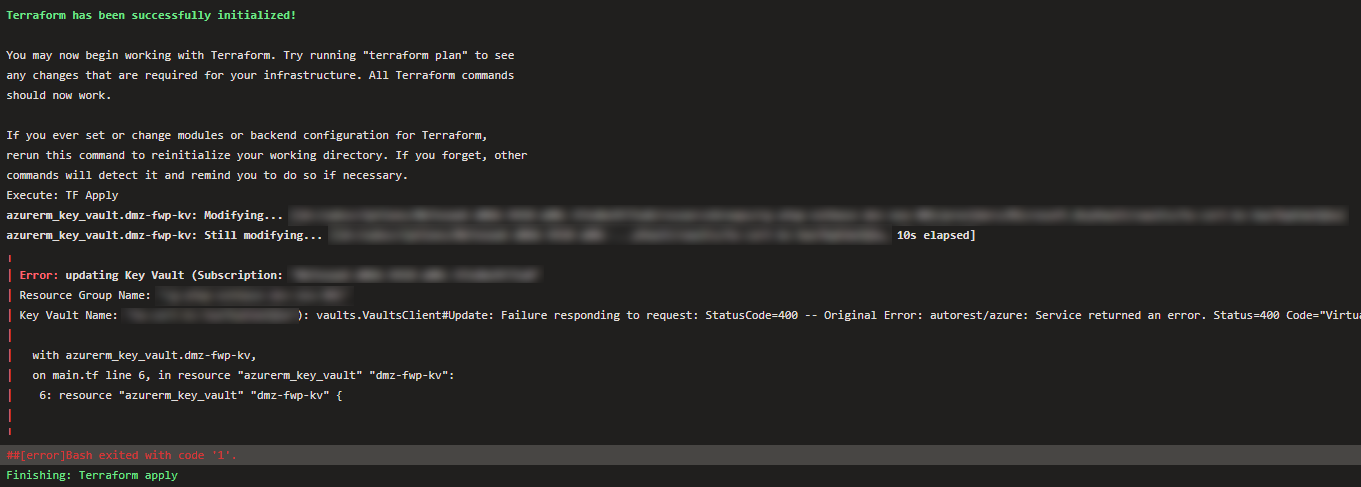
</p>

<p>First of all, I tried using the <a href="https://registry.terraform.io/providers/hashicorp/azurerm/latest/docs/resources/key_vault_certificate" target="_blank">azurerm_key_vault_certificate</a> resource but eventually discovered that the azurerm provider - or rather the Azure SDK - does not support the <em>Basic_Constraints</em> attribute required for the certificate, which is used to set the <em>is_ca_certitifcate</em> and <em>pathlength</em> properties. These certificate attribute properties are required to allow the Azure Firewall to issue temporary certificates for the TLS connection created by the Application Gateway.</p>

<p>After engaging Microsoft Support, they provided confirmation from the Azure Key Vault product group that there are <em>currently</em> no plans to support these features in the Azure SDK.</p>

<h4 id="dont-worry-i-hear-you-cry-you-can-use-the-hashicorp-tls-provider-instead">“Don’t worry!”, I hear you cry, “You can use the Hashicorp TLS provider instead.”</h4>

<p>Yes and no… The <a href="https://registry.terraform.io/providers/hashicorp/tls/latest/docs/resources/self_signed_cert" target="_blank">self_signed_cert</a> and <a href="https://registry.terraform.io/providers/hashicorp/tls/latest/docs/resources/locally_signed_cert" target="_blank">locally_signed_cert</a> resources do have a <em>is_ca_certificate</em> property, BUT they do not support the required <em>pathlength</em> property. In fact, there is an outstanding, and slightly confusing, enhancement request to <a href="https://github.com/hashicorp/terraform-provider-tls/issues/296" target="_blank">add max_path_length in tls_locally_signed_cert</a> to Hashicorp’s TLS provider.</p>

<h4 id="what-about-lets-encrypt">What about Let’s Encrypt?</h4>

<p>Unfortunately, Let’s Encrypt can only issue X.509 certificates to enable HTTPS on websites, they do not issue intermediate CA certificates.</p>

<p><strong>Summary:</strong></p>

<p>PROs:</p>

<ul>
  <li>Good for Dev/Test environments</li>
  <li>Good if you’re happy managing private keys and certificate lifecycle from the command-line using OpenSSL</li>
</ul>

<p>CONS:</p>

<ul>
  <li>Not a fully integrated IaC experience</li>
  <li>Requires additional automation to manage the certificate lifecycle</li>
  <li>Not recommended for Production environments</li>
</ul>

<p>Issues:</p>

<ul>
  <li>Neither the <a href="https://registry.terraform.io/providers/hashicorp/azurerm/latest/docs/resources/key_vault_certificate">azurerm_key_vault_certificate</a>, <a href="https://registry.terraform.io/providers/hashicorp/tls/latest/docs/resources/self_signed_cert" target="_blank">self_signed_cert</a> or <a href="https://registry.terraform.io/providers/hashicorp/tls/latest/docs/resources/locally_signed_cert" target="_blank">locally_signed_cert</a> resources <em>currently</em> support creating the required intermediate CA certificate</li>
</ul>

<h3 id="option-2---use-your-enterprise-pki-to-create-an-intermediate-ca-certificate">Option 2 - Use your enterprise PKI to create an Intermediate CA certificate</h3>

<p>For Production environments, Microsoft recommends <a href="https://learn.microsoft.com/en-us/azure/firewall/premium-deploy-certificates-enterprise-ca" target="_blank">deploying a certificate issued from your enterprise PKI</a>. That is fine, so long as it complies with <a href="https://learn.microsoft.com/en-us/azure/firewall/premium-certificates#intermediate-ca-certificate-requirements" target="_blank">Microsoft’s certificate requirements</a> and your enterprise security standards.</p>

<p>
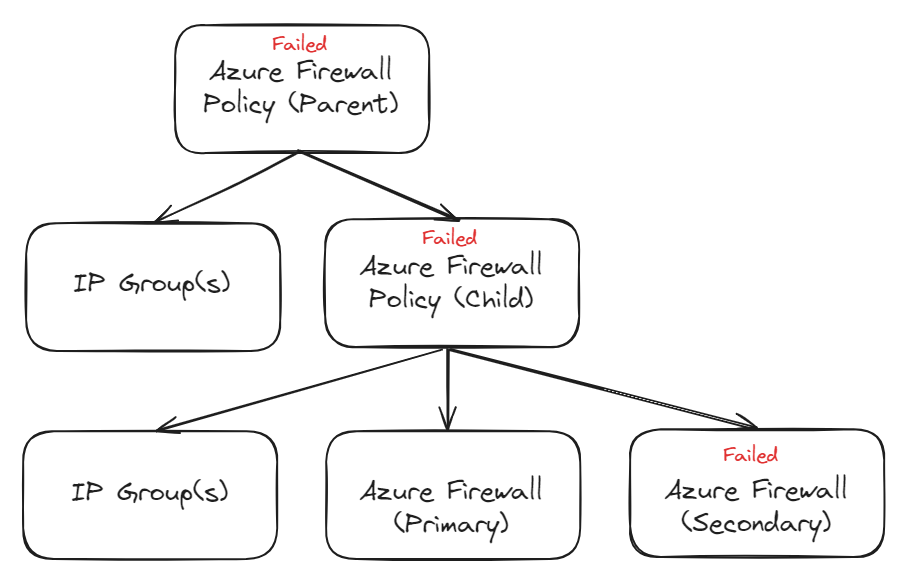
The latter was an issue for the customer I was working with because they DO NOT issue Intermediate CA certificates directly from their root CA. In fact, this was the certificate chain that was initially issued to the DMZ Azure Firewall;</p>

<p><img src="/images/2024-03-26-cert-chain.png" alt="Certificate Chain" class="centered" /></p>

<p>
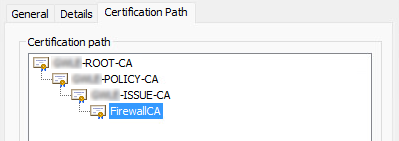
Initial suggestions by Microsoft Support were to bundle the certificate chain to uploaded to the Application Gateway, but this did not work. They later confirmed with the Azure Firewall and Application Gateway product teams that you can only upload a single certificate, meaning the certificate chain has to be no more than one level, i.e. a single root CA certificate or a root &amp; intermediate CA certificate.</p>

<p><strong>Summary:</strong></p>

<p>PROS:</p>

<ul>
  <li>Good for Production environments</li>
  <li>Certificate is managed by existing operational and security processes</li>
</ul>

<p>CONS:</p>

<ul>
  <li>Only works if your enterprise security standards permit the issuing Intermediate CA certificates directly from your root CA</li>
</ul>

<p>Issues:</p>

<ul>
  <li>You can only use your enterprise PKI if the Intermediate CA certificate is issued directly from your root CA, or you use the root CA.</li>
</ul>

<h3 id="option-3---certificate-auto-generation">Option 3 - Certificate auto-generation</h3>

<p>The Azure Portal allows you to <a href="https://learn.microsoft.com/en-us/azure/firewall/premium-certificates#certificate-auto-generation" target="_blank">auto-generate</a> the required Managed Identity, Key Vault and Self-Signed Certificate on your Azure Firewall. This also includes a certificate issuance policy that will auto-renew the certificate, minimising certificate management for your security operations team.</p>

<p>The obvious drawbacks of this are that “vanilla” resources are created, without any of the standard operational and security configuration that your organisation may normally apply when deploying these resources, such as naming convention, Service / Private Endpoints, Certificate Contacts, Diagnostic Settings etc. So, you have to retrospectively add these modifications afterwards.</p>

<p><strong>Summary:</strong></p>

<p>PROS:</p>

<ul>
  <li>Correct certificate is generated for use with Application Gateway and Azure Firewall</li>
  <li>Certificate will auto-renew, minimising management by security operations team</li>
</ul>

<p>CONS:</p>

<ul>
  <li>Resources are created with names that may not comply with your enterprise resource naming standard</li>
  <li>Resources are created with configuration that may not comply with your enterprise configuration and security standards</li>
  <li>Certificate cannot be exported for re-use elsewhere</li>
</ul>

<p>Issues:</p>

<ul>
  <li>The valid certificate created via the Azure Portal cannot be exported, or replicated using automation as it is not supported by the Azure SDK.</li>
</ul>

<h3 id="option-4---purchase-a-managed-private-pki">Option 4 - Purchase a managed private PKI</h3>

<p>I’ve added this option as I had ommited it from the original article. I did discuss it with the customer but they decided against it - for the time being - as it would’ve required a load of effort from a procurement and service management perspective, as well as having to align with, or at least consider, the enterprise strategic approach to PKI, and so did not align with the project timescales.</p>

<p>Essentially, this option involves purchasing a managed private PKI service, such as the one from <a href="https://www.globalsign.com/en/custom-ca-private-pki" target="_blank">GlobalSign</a>. This would theoretically give you a root and intermediate CA, which you could configure on your Application Gateway and Azure Firewall (respectively).</p>

<p>To be honest, I have not fully explored how this would technically work and there are a number of questions I didn’t have time to answer:</p>

<ul>
  <li>Would GlobalSign issue the root CA but then you use that to issue the intermediate CA?</li>
  <li>Could this leverage the native <a href="https://learn.microsoft.com/en-us/azure/key-vault/certificates/how-to-integrate-certificate-authority" target="_blank">Key Vault integration with Certificate Authorities</a>?</li>
  <li>How much would such a service cost, and is it value for money for this specific use case? It sounds like a service that might cost a lot to procure.</li>
</ul>

<p><strong>Summary:</strong></p>

<p>PROS:</p>

<ul>
  <li>Provides a managed enterprise PKI service</li>
</ul>

<p>CONS:</p>

<ul>
  <li>May conflict with, or require alignment with, your enterprise PKI strategy</li>
  <li>Will require time to go through procurement and service management processes</li>
  <li>Potential high-cost for this specific use case</li>
</ul>

<h2 id="wrap-up">Wrap-up</h2>

<p>Unfortunately, I don’t have a recommended one-size-fits all solution to this. All I can give you is some general guidance, and hope that some of what I’ve learned above will save you wasted effort in trying to implement a solution that is not supported or will not technically work.</p>

<p>My guidance is that you generate the Intermediate CA certificate using one of the following techniques, in order of preference:</p>

<ol>
  <li>Use your enterprise PKI if:
    <ol>
      <li>It conforms to your enterprise security standards, and</li>
      <li>The resulting certificate adheres to <a href="https://learn.microsoft.com/en-us/azure/firewall/premium-certificates#intermediate-ca-certificate-requirements" target="_blank">Microsoft’s certificate requirements</a>.</li>
    </ol>
  </li>
  <li>Use Microsoft’s config &amp; script(s) for <a href="https://learn.microsoft.com/en-us/azure/firewall/premium-certificates#create-your-own-self-signed-ca-certificate" target="_blank">creating a self-signed sertificate</a> if:
    <ol>
      <li>You need to automate the creation of the certificate</li>
      <li>Your enterprise security team sign-off on the risks of this approach</li>
    </ol>
  </li>
  <li>Use the Azure Portal if:
    <ol>
      <li>You’re not bothered about automating the certificate and the associated resources</li>
      <li>Your enterprise security team sign-off on the risks of this approach</li>
    </ol>
  </li>
</ol>

<h2 id="conclusion">Conclusion</h2>

<p>I hope this will be of help to you. Let me know if you have any suggestions for improvements in the comments.</p>]]></content><author><name></name></author><category term="azure" /><category term="azure-firewall" /><category term="application-gateway" /><category term="certificates" /><category term="tls-inspection" /><summary type="html"><![CDATA[If the title of this article isn’t long enough then the rest of the blog post will make up for it, because there’s a lot to cover.]]></summary><media:thumbnail xmlns:media="http://search.yahoo.com/mrss/" url="http://blog.philipstreet.co.uk/2024-03-26-cert-chain.png" /><media:content medium="image" url="http://blog.philipstreet.co.uk/2024-03-26-cert-chain.png" xmlns:media="http://search.yahoo.com/mrss/" /></entry></feed>